需求
Unity原生的Inspector对ScriptableObject的支持不是太好,如果把SO命名为数字Id,或是为SO配置Image,都难以预览,更好的方法是为SO专门重写一个Inspector,但太过复杂,于是参考RPG Maker Unite的数据库菜单,使用UI Toolkit写一个小窗口,将要管理的SO列表化,预览内容,点击定位到对应SO文件。
思路
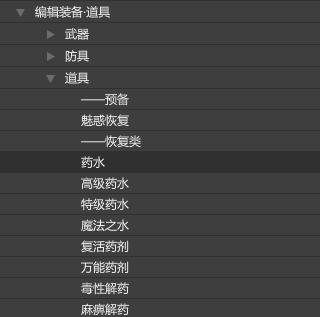
参考RPG Maker Unite的数据库样式:
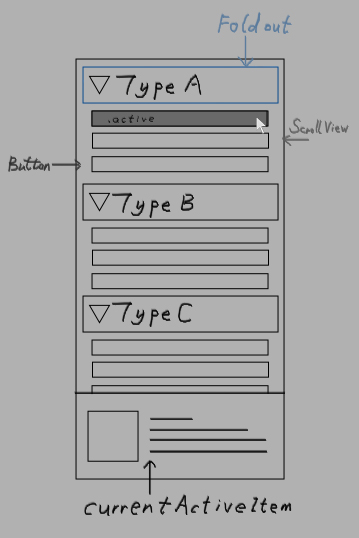
思路如图:
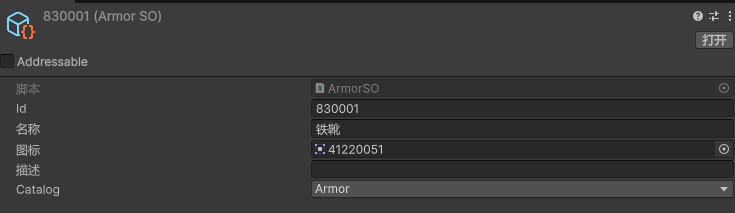
要管理的SO的属性:Id, Name, Icon, Catalog, 其中Catalog有三个枚举值:Item, Weapon, Armor:
折叠项显示:配置的Catalog,SO根据Catalog分类;
菜单项显示:SO的数字Id和配置的Name;点击事件为点击预览和点击定位SO文件;
CurrentActiveItem显示:SO配置的Image和Name、SO的路径;
接下来明确SO集合Items的数据结构:Dictionary<string, ScriptableObject>,其中,key为SO的guid,方便点击按钮定位对应文件。
解决方案
首先创建一个EditorWindow,里面有一个View,还要为View创建对应的uss文件来绘制元素样式。
源码参考RPG Maker Unite。
1
2
3
4
5
6
7
8
9
10
11
12
13
14
15
16
17
18
19
20
21
22
23
24
25
26
27
28
29
30
31
32
33
34
35
| public class DataHierarchyWindow : EditorWindow
{
private DataHierarchyView m_View;
public DataHierarchyView View
{
get => m_View;
set
{
m_View = value;
if (m_View != null)
{
rootVisualElement.Add(m_View);
}
}
}
private void Awake()
{
View = new();
}
[MenuItem("DataHierarchy/DataHierarchy")]
public static void OpenGraphWindow()
{
DataHierarchyWindow window = GetWindow<DataHierarchyWindow>();
window.titleContent = new("DataHierarchy");
window.minSize = new Vector2(318, 578);
}
private void OnDestroy()
{
m_View.Dispose();
}
}
|
在View里先绘制一个ScrollView:
1
2
3
4
5
6
7
8
9
10
11
| public class DataHierarchyView : VisualElement, IDisposable
{
private readonly ScrollView m_scrollView;
public DataHierarchyView()
{
m_scrollView = new ScrollView(ScrollViewMode.Vertical);
Add(m_scrollView);
RefreshCatalogueContent();
}
}
|
再在View里绘制预览区域,它与ScrollView同层级:
1
2
3
4
5
6
7
8
9
| private readonly VisualElement m_PreviewContainer;
{
m_PreviewContainer = new()
{
name = "preview"
};
Add(m_PreviewContainer);
}
|
根据思路,预览区域存在一个Icon和一个Container,Container里存在两个Label:
1
2
3
4
5
6
7
8
9
10
11
12
13
14
15
16
17
18
19
20
| private readonly Image m_Icon;
private readonly VisualElement m_TextContainer;
private readonly Label m_TitleLabel;
private readonly Label m_PathLabel;
{
m_PreviewContainer.Add(m_Icon);
m_PreviewContainer.Add(m_TextContainer);
m_TitleLabel = new()
{
name = "title",
};
m_PathLabel = new()
{
name = "path",
};
m_TextContainer.Add(m_TitleLabel);
m_TextContainer.Add(m_PathLabel);
}
|
假设Catalog有三个类型:Item, Weapon, Armor,对应ItemSO, WeaponSO, ArmorSO;
前面提到SO集合Items的数据结构是Dictionary<string, ScriptableObject>,
那么ScrollView的内容的数据类型为Dictionary<ItemCatalog, List<string>>;其中,value为guid的集合。
1
2
3
4
5
6
7
8
9
10
11
12
13
14
15
16
| public void RefreshCatalogueContent()
{
m_scrollView.Clear();
CreateCatalogueContent();
}
private void CreateCatalogueContent()
{
Dictionary<ItemCatalog, List<string>> dic = Items
.OrderBy(x => x.Value.Id)
.GroupBy(x => x.Value.Catalog)
.ToDictionary(
g => g.Key,
g => g.Select(x => x.Key).ToList()
);
}
|
遍历字典,创建UIElement:根据Catalog创建Foldout,根据SO配置的Catalog,创建Button,创建在相应的Foldout下;通过将guid赋值给Button的viewDataKey,在之后实现点击定位到对应SO文件。
1
2
3
4
5
6
7
8
9
10
11
12
13
14
15
16
17
18
19
20
21
| {
foreach (var kvp in dic)
{
Foldout foldout = new()
{
text = kvp.Key.ToString()
};
foreach (var v in kvp.Value)
{
Button button = new()
{
text = Items[v].Id + ". " + Items[v].Name,
viewDataKey = v,
};
button.clickable.clicked += () => { SetActiveItem(button); };
button.AddToClassList("selectableElement");
foldout.Add(button);
}
m_scrollView.contentContainer.Add(foldout);
}
}
|
为了实现点击预览功能,需要将点击的Button设置为currentActiveItem,通过Button的viewDataKey,在Items中查找currentActiveItem的SO对象,获取属性,在预览区域显示:
1
2
3
4
5
6
7
8
9
10
11
12
13
14
15
16
17
18
19
20
21
22
23
24
25
26
| private static VisualElement currentActiveItem;
private void SetActiveItem(VisualElement item)
{
DeactivateAllItems();
currentActiveItem = item;
currentActiveItem.AddToClassList("active");
SelectAssetInProject();
UpdateItemPreview();
}
public void DeactivateAllItems()
{
this.Query<Foldout>().ForEach(f => { f.RemoveFromClassList("active"); });
this.Query<Button>().ForEach(f => { f.RemoveFromClassList("active"); });
this.Query<Label>().ForEach(f => { f.RemoveFromClassList("active"); });
}
private void UpdateItemPreview()
{
string key = currentActiveItem.viewDataKey;
m_TitleLabel.text = Items[key].Name;
m_Icon.sprite = Items[key].Icon;
string path = AssetDatabase.GUIDToAssetPath(currentActiveItem.viewDataKey);
m_PathLabel.text = path;
}
|
为了美观,可以配置uss样式,为Button的元素类hover和active配置悬浮态和选中态颜色:
1
2
3
4
5
6
7
| .unity-button:hover {
background-color: rgba(48, 48, 48, 1);
}
.unity-button.active {
background-color: rgba(44, 93, 135, 1);
}
|
同样,也可以为preview区域配置对应的uss样式:
1
2
3
4
5
6
7
8
9
10
11
12
13
14
15
16
17
18
19
20
21
22
23
24
25
26
27
28
29
30
31
32
33
34
35
36
| DataHierarchyView
{
height: 100%;
width : 100%;
}
DataHierarchyView > .unity-scroll-view
{
flex-grow: 1;
}
DataHierarchyView > #preview
{
align-self: stretch;
height: 100px;
background-color: rgba(49,49,49,1);
justify-content: flex-start;
align-items: stretch;
flex-direction: row;
padding: 16px;
}
DataHierarchyView > #preview > #icon
{
width : 64px;
height: 64px;
background-color : #E1E1E1;
}
DataHierarchyView > #preview > #container
{
flex: 1 1 auto;
margin-left: 16px;
flex-direction: column;
}
|
将uss样式添加到View类的方法是:
1
2
3
4
| public DataHierarchyView()
{
styleSheets.Add(Resources.Load<StyleSheet>("Styles/DataHierarchyView"));
}
|
最后再做一下点击按钮,在Project面板中定位到对应SO文件的功能:
1
2
3
4
5
6
7
| private void SelectAssetInProject()
{
string path = AssetDatabase.GUIDToAssetPath(currentActiveItem.viewDataKey);
UnityEngine.Object obj = AssetDatabase.LoadAssetAtPath<UnityEngine.Object>(path);
EditorGUIUtility.PingObject(obj);
Selection.activeObject = obj;
}
|
到这里基本就完成了,但还有一个问题:打开管理菜单的时候,如果变更了SO的配置,要怎么更新?其实只需要再创建一个Action,订阅事件,在SO类的OnValidate方法回调就好。
1
2
3
4
| {
SO.OnSOModified += RefreshCatalogueContent;
SO.OnSOModified += UpdateItemPreview;
}
|
需要注意的是,OnValidate的定义是加载脚本后或检视面板中的值发生更改时,将调用此函数,为了只在值发生更改时回调,可以在OnValidate方法中加一个判断:
1
2
3
4
5
6
7
8
9
10
11
12
13
14
15
16
| public class SO : ScriptableObject
{
public static Action OnSOModified;
private bool firstOnValidateHasOccurred;
private void OnValidate()
{
if (!firstOnValidateHasOccurred)
{
firstOnValidateHasOccurred = true;
return;
}
OnSOModified?.Invoke();
}
}
|
除此之外,管理工具还要考虑几个问题:如何把所有SO添加到Items中;管理菜单打开状态下,创建和删除了SO,如何刷新列表。暂时不一一赘述了。
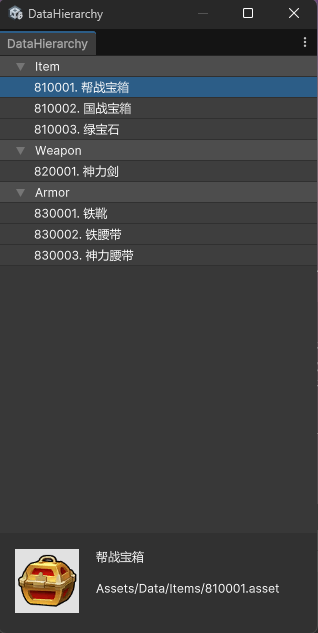
最终效果如图:
文档链接
UI Toolkit
FirstOnValidateHasOccurred